Shortly after our home was built we had a concrete patio poured and shortly after that, my husband built a fire pit where we could sit and enjoy warm summer nights. But that's pretty much all that had happened besides the addition of our old patio table and some plastic Adirondack chairs (which broke within a month, grrrr).
So, we finally decided to get at our project. After talks of pergolas and water fountains and sitting walls and counters, we finally selected our final plan and all the things we'd need to finish off the space.
Purchase list:
- new Adirondack chairs, WOOD
- landscape lighting
- planters and lots-o-flowers
- new grill
- water fountain
- new landscaping behind fire pit area
- stone and more stone
To do list:
- stain concrete
- create a sitting wall to the left of our patio door (or to the right if looking from the pic below)
- build an "outdoor kitchen" or essentially build in our new grill on the opposite side
We were admittedly a bit nervous about the staining because our concrete guy actually refused to do it ... the results are apparently unreliable. Not surprisingly, even the advice of a trained professional who does this for a living could not persuade us to steer clear of this project. So ... we just buckled down and did it anyhow.
To get started, we needed to sweep and power wash the concrete. I essentially did the sweeping and that was about the end of my roll in this project. Beyond that I was assigned to buy beer and keep our kids out of the way.
Here are the "just washed, pre-staining" pictures. See, just a big ol' boring piece of concrete. Puh. No good.

And another shot of the concrete in the shade (because I'm really bad about taking pictures at more opportune times). You can't tell but it's a ho-hum gray. Concrete gray. Yick. Again, no good.

After that was dried, my husband started painting the outside boarder. He suggested doing two different shades and I was on-board. I selected the colors and he got to work. For the "trim" he used a cheap foam brush and it seemed to work well. Well, I guess it required a second coat but it went pretty smoothly (or appeared to from where I was watching).


Once that was done, he started on the main concrete area which he applied with a sprayer and then used a broom to sweep it in. After the first layer, he applied the lighter boarder color in sweeping motions on top. He then used the broom to swirl that around and mix it in with a dark, chocolate brown.

Finished ...

We really like how it turned out because it added a richness to the space and gave us a much more inviting foundation to build on. So far we're really happy with it.
The next step is where it really got interesting. Let's, oh, I don't know, build a sitting wall! Geez. I wonder where we get the ideas to tackle this stuff on our own. Pure insanity. But we forge on.
First step, concrete blocks.
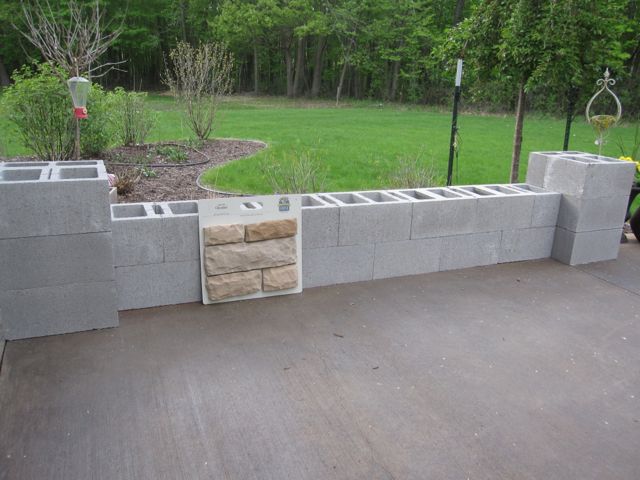
Kinda cool, right? I was uber impressed with my hubby's mad block building skills.
We also looked through a number of stone samples that would be close to the stone used on the front of the house. This guy was the closest one. Ding, ding. We have a winner!
Next he laid out all the stone so he could see the different sizes he was working with. And that's some mortar that he mixed up in the background there.

Here's how it looked as things got underway.


And then, after some very long hours of putting up stone and grouting it (I'm told until his finger tips fell off) ... and even adding some lighting (OMG) ... it looked like this!!
I am still in awe of the work he did on this. Literally. Mouth. Still. Open. or Smiling.

My next job was to add in some colorful plants and flowers that I placed in about a million different containers of all shapes, sizes and colors. I started with bright pops of turquoise and purple, and yellow to go with our yellow Adirondack chairs. And then I just said oh what the heck, why not pink too.

These guys aren't flowering at just this moment so use your imagination.

Here's a shot from a little further back. Really coming together.

And one from the other side of the wall.

What's left to do is the other side where we'll be building in the grill. Hopefully I'll have an update on that in a couple weeks. And hopefully by then the rest of our landscaping will be in around the fire pit. This is what the grill area looks like now. Not so nice but we're getting there ...

Meantime, the new chairs, flowers, landscape lights and fountain make it a great space to enjoy summer. I'm looking forward to many more days and nights out here with these crazy kids.

Ahhh, relaxing!