Monday, September 16, 2013

Our Little Cowboy's 1st Birthday Bash

I always thought a cowboy party would be fun so it was a no brainer when our youngest turned one this July. Sadly, I'm just getting around to posting about it!

With the help of my sister, we got some great photos to use for the invite and a few welcome posters that were scattered around the house. I can't get over some of these. What a little chunky nugget he was ... this cowboy was having him some steak!


I'm particularly fund of this butt shot. I'm sure he'll hate me for it someday ...


Then I stuck him in some skinny jeans that were a little snug around his belly. Ooops.


Needless to say, we had plenty of good material to work with. 

I also ordered a full set of printable party goodies from LeeLaaLoo on Etsy. The package I purchased had everything from banners to custom water bottle labels to thank you cards. I just sent the file off to Office Max and when ready, got my mad cutting skills on. 

I used those printables to make all sorts of goodies!

For example, they turned these dollar store red napkins into something totally cute. Throw them in an apple bushel basket and it's just right for a ho-down!


The food was kept simple and a little rustic. We ordered in sandwiches, served sausage sticks in mason jars, fresh sugar snap peas, some snacks and some little cowboy desserts. These "hay bales" were a snap to make using a traditional rice crispy treat recipe and some peel and pull licorice!


I also did some mini pecan pies and some campfire s'more treats. Yum, yum.
 
Older looking containers, some framed pics and some other western signs gave the place just the right vibe.


These tables and covers were rented to provide some extra seating and I picked up some wildflowers from the Farmer's Market that morning to place in labeled canning jars. Throw a chicken wire basket next to it for some snacks and you're good to go. 

There were lots of other little touches I tried to do all around the house. Here's a sampling ...

Sunflowers & Mason Jars...

Fireplace Banner ...

Door signs & drink menus with lots-o-choices for big and lil' cowboys and girls...


Wanted Posters ...

And then of course desserts! I made this cake and these piped sugar cookies for my lil' man.

I think he's impressed.

These cactus, cowboy hat and cow-print cookies were fun to make and super delicious!

They were set out as favors.

Then just to make sure our little buckaroos were well outfitted, we set up some hay bales complete with cowboy hats (also from the dollar store), sheriff's badges, mustaches, pistols and bandannas. Yee haw!


And then since a cowboy isn't right without his horse, this guy joined the party for a few hours to give unlimited rides. It. Was. A. Hit. 

Seriously ... can't even handle that smile.


Party down y'all!


Sunday, September 8, 2013

Backyard Makeover Complete! (Thanks to the best hubbie. Ever.)

Well after a number of weekends spent plugging away at this, my husband finished up our backyard makeover. And it looks fab.u.lous. I'm so proud of him. Amazing.

So here's what we've been up to since the last post.

1. The new landscaping went in around the fire pit area.
2. Our new, yellow Adirondack chairs started peeling and looked terrible. We had to return them and we simultaneously gave up on this style of chair. On to Plan B.
3. Plan B. We purchased a new dinning set and decided to repurpose the chairs from our old table around the fire pit. Since they're really comfortable and dry quickly after a rain, this ended up being a great solution. The new dinning set also extends to fit extra people and looks gorgeous with the stone. Win, win.
4. My husband built the "kitchen" area. And it-is-awesome.

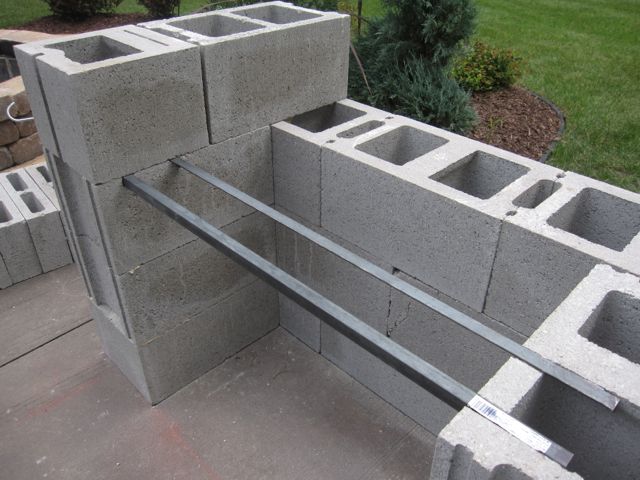
He started with concrete blocks again, framing out the grill area.


Since we decided to make two holding areas (one for firewood and another for grilling tools) he needed to rig a way to do that and hold the weight of the countertop that would ultimately go on top. He used iron bars between the bricks to do that. 


Here's what it looked like when all the bricks were in place. 
Front:


Back:

Then in the wee hours of the night, he built forms for the concrete countertops. 


That shinny silver stuff was used to give the edges of the countertops some texture. 


The concrete needed to sit in the forms for a couple days to cure. Meanwhile he got started on the brick work, repeating what he had done for the sitting wall. I'm going to save you all of those photos again and will just get right to the good part. Ta Daaaaahhhhhhhhhhhhh


Holy smokes are you kidding me? Best. Husband. Ever. Seriously, he built this. Me = Smitten (umm, with him and our new kitchen area).

The opening to the left still needs some tile inside and once complete, will hold logs for the fire. The spot to the right needs tile too and when my kids put their bubbles away (ugh), this area will hold grilling tools and serving trays. The countertop will also get sealed after it cures for a few more weeks at which point it will be more brown in color.

Here's a look at the whole new space, landscaping and new accessories included. 


And then just for fun I suppose we should do a before and after. 

Remember this?


Well that's a slightly closer up view to this...


which didn't have this sitting wall ...

or this!!


Can't even handle it!

We're so excited to spend time in our new space. There are only a few minor additions we need to do yet until next summer when we'll contemplate some couches and some overhead, outdoor bistro lights. Meantime, hope you enjoyed a peek at our summer project!